Free UK Delivery Over £30 |
Same Day London Delivery


Looking to start vaping? We’ve all been there… Here at House of Vapes, whether in store or online, we are always happy to help and recommend the device that will suit your needs most.
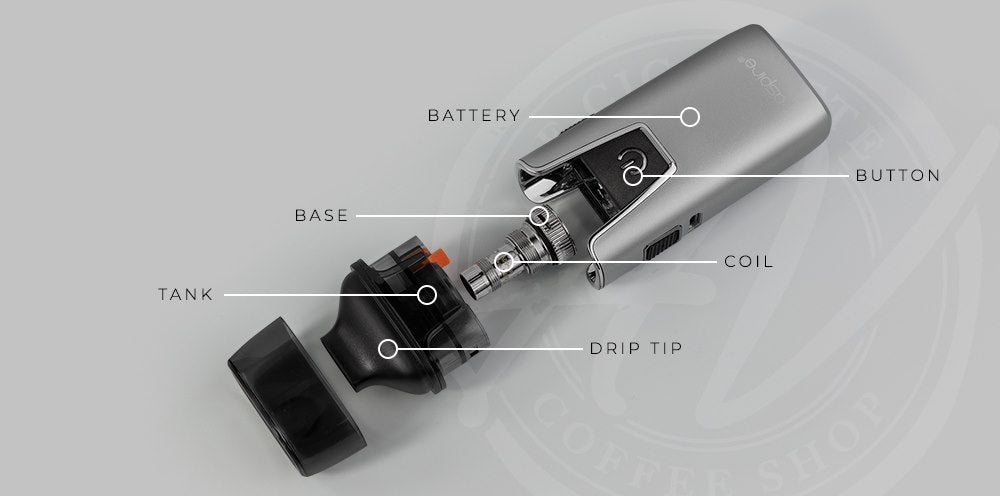
Battery – The Battery is the piece that feeds and provides the device with electric in order to send energy to the coil and operate.
Button – The button needs to be pressed to be activated. This could be 5 clicks to turn on / off and 3 clicks to change settings (depending on device). Pressing the button will send power to the coil which will generate heat and vapour production.
Base – Screws the coil to the battery to form a connection. This piece also contains an adjustable air ring (depending on the tank as it could be at the top of the tank), the airflow can be adjusted to suit the user’s requirements.
Coil – The heart of an electronic cigarette, housed in a metal surrounding, the coil is wrapped inside and has organic cotton running through it. Once you heat this up and saturate it with liquid, it will allow vapour to be produced. These are ideally changed every 2-3 weeks (depending on the user).
Tank – A compartment that holds the e-liquid and screws onto the battery. Regulated to maximum 2ml.
Drip Tip – The Drip tip is the part that makes contact with the mouth. This piece plays a crucial part in comfort, flavour and temperature of vapour when inhaling.
As you can see, we have come up with a step-by-step guide to help you get started with your new pod-style device that will help you kick away your tobacco cravings.
a. Some pods are prefilled, meaning that the pod is already filled with liquid and there is no option to refill it. When this type of pod tastes a bit burnt, it’s a simple plug in and play.
b. Most pod systems have a preinstalled coil without the option of removal. You would need to skip to step 3 in the Step by Step above, please do not attempt to remove the coil from the pod.
c. Coils last between 2-3 weeks; this depends on the user (i.e. wattage and consistency), the coil used (low or high ohm) and e-liquid used (sweet or not).
d. It is not recommended to charge your device with a charger that outputs more than 1.0amp and overnight. This can cause your battery to overcharge which will, in the long run, be a very bad experience (less battery life, overheating). We tend to tell all our customers to not do this as a safety precaution.
e. Do not vape whilst charging the device. In this instance, we urge our customers to not vape their device whilst charging it. The only reason you would is if your device has a built-in passthrough system. This means that the device is not using the battery to operate whilst on charge, it is taking the battery straight from the power source.
f. You can saturate the cotton faster by covering the airflow and taking a pull, remember to not click the button whilst attempting this trick. When doing this, be sure to take a pull that’s not too hard, as it might cause leakage and spillage from the drip-tip.
g. Bear in mind, all e-liquids are not compatible with one device, remember to check your coil resistance. Depending on the coil used, you can kind of determine which liquid would suit best.
Below we have created a table to help you decide which e-liquid ratio suits you most:

The reason you would need to match the coil resistance with the PG/VG ratio is due to the thickness of the VG. VG is a sweet yet thick ingredient, which means that most coil resistances above 0.8ohm will struggle to wick with thicker e-liquid. What is wicked? This is when the liquid is able to travel down the tank, into the coil through the cotton hole.
Hopefully, you have found this article to be helpful. If not, do not hesitate to come into any of our stores for further advice or contact us via live chat or phone.
House of Vapes - Team

Struggling to find gifts for your friend or family who vapes? Look no further than our Christmas vape gift guide 2025! From starter kits to disposable vapes we've got everything covered in our new Christmas vape gift guide.


With the recent addition to the PAX range of the PAX FLOW and the already popular PAX Plus and PAX Mini dry herb vaporizers we wrote this blog post to take a look at what their features are, how to know which is best suited to you and whether they're safe to use.
Customer Service
Monday - Friday: 9:00AM - 17:00PM
Saturday - Sunday: Closed
+44 (0) 20 3962 0485
info@houseofvapeslondon.co.uk
Sign up to get the latest on sales, new releases and more …